
You can check out Verizon’s online store if you’re looking for an affordable way to get a new LCD or digitizer frame assembly for your Motorola Droid Turbo. Not only do they have the best prices around, but they also offer free shipping on orders over lcd phone parts.
What is an LCD and Digitizer Frame Assembly Verizon Logo – Black for Motorola Droid Turbo?
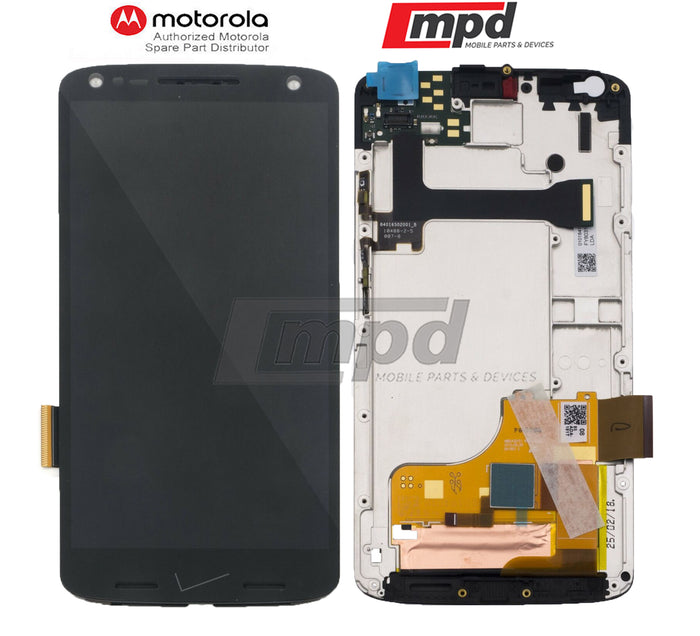
An LCD and Digitizer Frame Assembly, also known as a screen assembly or display, is an electronic component located on the front of the Motorola Droid Turbo. This part includes the LCD and the digitizer. The LCD is what you see on the device’s screen, and the digitizer is what allows you to input text and other commands.
The assembly can be divided into three main parts: the LCD panel, the backlight, and the digitizer frame. The LCD panel is just like any other panel, and it contains all of the necessary circuitry to power up the device and render images onscreen. The backlight is responsible for casting light onto the LCD panel to create images that are visible to users. Lastly, the digitizer frame attaches to the backlight and completes the overall look of the device’s screen lcd phone parts.
How to install an LCD and Digitizer Frame Assembly Verizon Logo – Black for Motorola Droid Turbo?
If you own a Motorola Droid Turbo, then you likely know that the LCD and Digitizer Frame Assembly are missing. Luckily, this is an easy fix and can be done without any special tools. Here are the steps:
1. Remove the battery cover on the back of your Droid Turbo.
2. Pry off the plastic shield covering the LCD and Digitizer Assembly.
3. Remove the screws that hold the LCD in place, then gently pull it out of the frame.
4. Install the new LCD and Digitizer Frame Assembly by reversing these steps. Be sure to reconnect all of the screws before replacing the shield Cell phone parts .
Pros and Cons of installing an LCD and Digitizer Frame Assembly Verizon Logo – Black for Motorola Droid Turbo?
There are pros and cons if you are looking to replace your broken LCD or Digitizer Frame Assembly on your Motorola Droid Turbo. On the plus side, these parts are usually cheaper to replace than a whole phone, and they can be done fairly easily by a non-technical person. However, some potential problems should be considered before making the purchase. First and foremost, if the LCD or Digitizer Frame Assembly does not fit your phone perfectly, it may not work properly and even cause more damage to the device. Another consideration is that if the part breaks during installation, you may end up with a useless phone. So, while replacing a broken LCD or Digitizer Frame Assembly on a Motorola Droid Turbo may be cheaper in the short run, it could also be more expensive in the long run lcd phone parts.
How to take apart an LCD and Digitizer Frame Assembly Verizon Logo – Black for Motorola Droid Turbo?
This blog will show you how to take apart an LCD and Digitizer Frame Assembly Verizon Logo – Black for Motorola Droid Turbo. This guide applies to both Verizon Droid Turbo models with 4.7-inch and 5.5-inch displays.
The following steps are necessary to take apart an LCD and Digitizer Frame Assembly Verizon Logo – Black for Motorola Droid Turbo:
1. Start by removing the two screws that hold the front cover. Then carefully lift the cover off of your device.
2. Next, locate the two ribbon cables that connect the LCD to the motherboard. Pry gently away from the LCD using a small flathead screwdriver, careful not to damage them lcd phone parts.
3. If necessary, use a Phillips head screwdriver to remove the four screws that secure the LCD screen to the frame assembly. Once they are loose, gently pull on the screen until it separates from the frame assembly.
4. Detach the touch panel from its connector on the motherboard by gently prying it away from its housing with a small screwdriver or your fingers.
5. Finally, remove all of the components from your lcd phone parts .
Conclusion
A cracked or missing LCD/Digitizer Frame Assembly on your Motorola Droid Turbo? If you notice that the LCD/Digitizer Frame Assembly on your Motorola Droid Turbo is cracked or missing, there are a few things you can do to try and fix the issue. First, try to replace the entire assembly if it is possible. If replacing the entire assembly is not an option, you can try to install a new LCD/Digitizer Frame Assembly from Motorola.